President Obama announced the “Week of Making” the week of June 12 – 18, 2015, and eleven educators from the Pittsburgh region were invited to the White House on June 15, 2015 to discuss what great makerspaces look like in schools and how we can scale this movement across the country in schools. But not everyone can visit Obama to talk about Making--so how does one lead professional development when introducing a makerspace?
At Elizabeth Forward High School, the 2015 Pittsburgh FAB Institute was held June 15 – 18, 2015. Sponsored by the Grable Foundation, the 2015 Pittsburgh FAB Institute provided a rich professional development to 75 teachers across the country focusing on digital fabrication. These educators ranged from beginners to experts, elementary, middle and high school teachers, educators from museums, college professors and school administrators and these educators were interested in what aFABLab looks like in schools.
Putting the “Station Rotation” Model to Work
For the first three days of the Pittsburgh FAB Institute, the 75 educators rotated through two stations each day, where each station lasted three hours and the educators were grouped according to ability. To get the educators revved up, each morning started with a keynote speaker to inspire the educators about design and creating makerspaces within schools. The keynotes included Dr. Stephen Whitehead (Associate Provost/Vice President of Innovation and Academics from California University of Pennsylvania) and Mike Hripko (Vice President of Youngstown State University, formerly from American Makes).
During each of the six stations, we wanted to give the educators a wide-range of free and paid software programs in the digital fabrication world. So, the educators used different software and hardware, from Mac laptops to iPads. Teachers were grouped according to their ability from a brief survey they took before the first day training. We wanted the advance makers to learn even more about digital fabrication and the beginner makers to feel comfortable with the software and hardware.
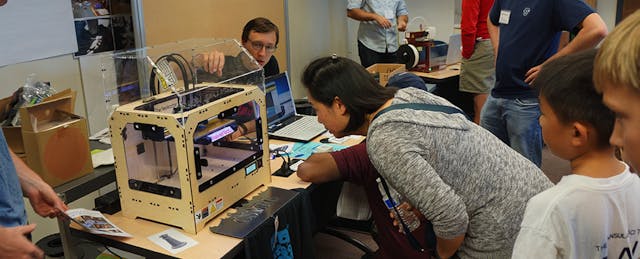
Station 1 – Educators learned about 3D printing and 3D scanning using 123D AutoDesk software, several MakerBot 3D printers and the iSense 3D scanner. During the three hours, the educators learned the 123D software and create nametags and 3D printed the nametag (see below). Educators also 3D scanned their heads and 3D printed them. The educators quickly realized how students in their own classroom can now design an object and easily 3D print them!


Station 2 – Educators learned to design in 2D and 3D using Aspire Vcarve software and a CNC EZ-Router. During the three hours, the educators learned the Vcarve software and created nameplates using the CNC router, all digitally fabricated. After the three hours, the educators soon realized the power of having students design a piece of furniture on a computer and having a machine cut the parts out without using a table saw or drill press!


Station 3 – Educators learned to design in 2D and 3D using Inkscape software with the Epilog Laser cutter. During the three hours, the educators digitally fabricated a cube and designed graphics on each side of the cube. The educators realized the power of the laser cutter (see below to the right), from etching to cutting and how students from kindergarten to 12th grade can make almost anything!
Station 4 – Educators learned to design in 2D using Adobe Illustrator using the Roland Vinyl cutter. During the three hours, the educators learned to design in Illustrator and use the Cut Studio software to make vinyl signs and lettering. During the training, several of the educators reached out to their principals to purchase a vinyl cutter for their own buildings! The educators witnessed how powerful to teach design thinking, create an image and have the vinyl cutter cut the image out.
Station 5 – Educators learned to program Arduino micro-controllers using the Arduino Starter Kits (see below). During the three hours, the educators learned the basics of the Arduino and programmed motion, light and sound sensors, lights and temperature sensors. Several of the educators integrated the Arduino to other projects within the other stations. The educators realized the power of design thinking and now the programming skills the students are learning through the Arduinos.


Station 6 – Educators learned to design in 2D using Corel Draw to create flexible circuits using copper adhesive with the Roland Vinyl cutter. During the three hours, the educators digitally fabricated flexible circuits using LED lights and battery packs. When the educators completed this station, the realized how fun learning about circuits can be and how art can be integrated into teaching circuits.
Putting it All Together
On the fourth and final day, the educators were able to connect with one of the instructors of any of the six stations and make. Educators were challenged to using multiple stations in their designs, digitally creating vinyl letters, a mini-arcade system, a baseball bat holder, nameplates using the CNC router and the laser cutter, laser cut box with lights using the flexible circuits and several different furniture pieces--all digitally-fabricated.
In schools, we are in teaching silos (and teach that silos exist!), and students hardly ever see the integration of art, programming, design thinking and digital fabrication. The educators who participated in this institute ranged from computer science teachers, art teachers to technology education teachers. The educators themselves worked to together to help each other to make better projects.
So how can we--and you--bring down the silos in schools and give students the integrated approach to making?
Importantly during this week of making, The Sprout Fund, non-profit in Pittsburgh, premiered the first release of the Remake Learning Playbook, a field guide for building and sustaining collaborative networks like Pittsburgh's own Remake Learning Network. We are eager to get the Playbook into the hands of learning innovators and policymakers who might benefit.
The Pittsburgh FAB Institute was a team effort from several school districts in Western Pennsylvania and several instructors from Ohio. Any school district across the country could offer a similar training to help bring down the silos in schools, between art, computer science and technology education. Look around your own school or nearby school districts and determine your expert teachers in digital fabrication and run with the training! Reach out to local sign companies, fabrication companies, art institutes and software companies for experts in digital fabrication to help train your staff in this maker movement!

