How can you migrate a live, in-person class to an online setting quickly, without needing to redesign the class? If you have time to redesign the class into five-minute videos and autograded homework, that’s great! But if you don’t, here’s what you can do.
We will go through three quick options with increasing levels of complexity and equipment/setup needed. I recommend using the most sophisticated of these options that you feel comfortable with.
Option 1: Paper-based teaching
Point a camera at a piece of paper, write on it and lecture. Here’s what your setup might look like.

And here’s what your student will see:

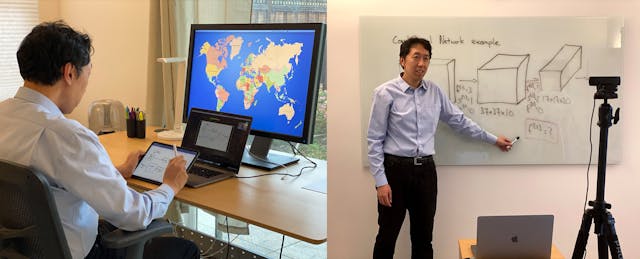
Option 2: Whiteboard or easel teaching
Point a camera at yourself while lecturing in front of a whiteboard or easel+paper pad. Your setup will look something like this:

And what your students will see:

Options 1 and 2 are much easier with an external webcam, which is sold out on most websites right now. If you don’t have a usable webcam, consider Option 3 instead.
Option 3: Writing using a tablet/stylus or using slides (without a stylus)
Here’s what your setup might look like:

And here is what your students will see:

If you don’t have a tablet/stylus but you do have prepared slides, you can use this option too.
In terms of pedagogical effectiveness, I prefer Option 3 over Option 2 over Option 1. But depending on what equipment you already have and what slides you have already prepared, Option 1 may be easier to implement than Option 2, which may be easier than Option 3.
Some Implementation Tips
For Options 1 (paper) or 2 (whiteboard), get an external webcam. This is hard to do with your laptop’s built-in camera since positioning it can be challenging. Any reasonable, modern webcam should work fine. As long as you are able to position the camera where you need it, don’t sweat the webcam specs too much. Possibly Option 2 (whiteboard) could work with your laptop’s built-in camera, but definitely not Option 1 (paper).
The autofocus on many webcams will have a hard time focusing on the paper and/or whiteboard, leading to a blurry image. Here’s what you should do:
On Macs: I use the program Webcam Settings (available in the Mac App store) to control my camera’s parameters. Make sure to turn off autofocus.

On Windows: See if the manufacturer of your webcam has free software. Alternatively, the Windows app store sells a program called Webcam System Settings that you can use to disable autofocus and adjust other camera parameters.

In addition, if you plan to use colored pens/markers, play with the camera’s sharpness, saturation, contrast, and brightness settings to make the colors show up clearly. Webcams are not designed to film flat pieces of paper or whiteboards, and these parameters can have a huge impact on the legibility of your handwriting. If you use colored pens, these settings will also affect whether the colors show up or if all colors appear black.
Other tips to think about:
Consider buying a USB extension cable. A typical webcam USB cable might be six-feet long, but depending on your room geometry, sometimes a few extra feet of cable can make your life easier (especially with Option 2) when you’re trying to position the camera. If you use a new Mac with USB-C ports, also make sure you have a male USB-C to female USB-A adapter for the webcam.
With any of these options, you can also easily switch between projecting a web browser, a desktop app, etc. to show a demo. For example, when coding, I sometimes switch over to a Jupyter notebook in my browser and share (show the students) my browser window in Zoom.
You can also go to Zoom’s video settings and uncheck “Mirror my video.” The students will see the same thing (an unmirrored video) either way, but this way, the text won’t appear to be backwards to you.
Let your family members know in advance when you’ll be broadcasting live so you don’t end up like this BBC interview.
The Mechanics of Managing a Live Online Class
Just as we are figuring out how to teach online, our students are also figuring out how to learn online!
If you are using Zoom to schedule meetings in advance, here are some recommended configuration settings when scheduling meetings:
1. Set video to “on” for both host and participant
2. Schedule lectures at the assigned time slot for the class
3. Select the following configuration options in Zoom:
- Disable join before host
- Mute participants upon entry (otherwise there will be a lot of background noise)
- You can also record the meeting automatically (so you can post the video for students in far-away timezones). If your institution has the option of saving the recording in the cloud, I recommend taking advantage of that. (Alternatively, you can also start recording manually in Zoom.)
4. When the time comes, log in to Zoom, and you’re off!
If you are recording the video, please let students know that you are doing so at the start of the lecture, and also make sure to comply with student privacy laws (such as FERPA). Recording and posting lectures online will be important for students that may not be able to attend live. I strongly recommend practicing at least once—say, deliver five minutes of your lecture to a TA—before the class to make sure you’re familiar with all of the buttons, how to use chat, ensure that your ink is visible, and so on. Also make sure that Zoom has all of the needed permissions enabled. If you are planning to ask a TA to host the Zoom session, do a practice session with them. However, Zoom is easy enough to use, so I usually just do this myself.
In addition, here are some ways to make the class more interactive.
Use Chat
One advantage of online, live teaching versus teaching in a classroom is that any student can ask a question in the text chat at any time without “interrupting” the lecturer. I usually keep the Chat window in Zoom open while I’m speaking, so that I can see if someone is asking a question.
To encourage students to ask questions:
- At the start of the class, ask everyone to answer an icebreaker question in Chat such as, “Hey, everyone jump into Chat and tell us something cool you did over the weekend!” I particularly like questions that let the students “brag” about something they did. Doing this also gets everyone familiar with the Chat function.
- When someone does ask a question in Chat, call them by name and thank them for their question. This will encourage others to do so.
- If you want students to answer each others’ questions in Chat, you should also encourage this explicitly and thank them when they do. Let’s say that a student asks, “What is an RNN?” because you wrote “RNN” without explaining. Another student may reply in Chat, “Recurrent Neural Network.” So the question is answered without you even having to break the flow of the lecture.
- Sometimes, if a student asks a question in Chat but I don’t understand what they mean, I’ll also invite them to jump onto audio and explain their question verbally.
During the class, you can also ask questions and get everyone to answer! In a physical classroom, usually only one student at a time gets to answer. But now you can ask everyone to participate. This works best if you ask low-stakes questions where there are no wrong answers. Since students’ responses are public, this way there is less risk of embarrassment. For example, I’ve made requests such as, “Everyone please name one ethical challenge of AI” (where hardly anyone ever gives a wrong answer) or, “Would you use algorithm A or B, and why?” (where both are reasonable choices). This allows you to generate discussion about people’s reasoning.
I know you’re busy and might not have time to redesign a lot of material. But coming up with a few discussion questions where you can get everyone to participate, and sprinkling them into your lecture, will be a high ROI use of your time. You can then also read the students’ responses and give live feedback and commentary on them. If you want to just dip your toe in to start, feel free to start small and try just one or two questions in your first lecture that you ask people to answer in Chat. For the long term, asking one question every 10 to15 minutes would be great, and it will make your online class feel much more interactive.
Encourage Use of the ‘Raise Hand’ Feature
In the “participant view,” there is a Raise Hand button that students can use, which causes a “Hand” logo to appear. (Depending on the version of Zoom you’re using, UI appearance may differ.) Many students will not be familiar with this feature, so teach them at the start of the quarter. This is a good way to let students request to jump onto audio to ask a question.

Ask Everyone to Turn on Their Webcams
As an instructor, you will get a better feel of the audience’s reaction if their webcams are turned on, and you will be better able to respond to the students. Students will also be more alert if everyone can see each other. Sometimes this isn’t possible for a few students (e.g., if they’re in a low-bandwidth environment) but we should consistently encourage this. I usually bug everyone to turn on their webcams.
Consider also asking a TA to be responsible for logging in and sending private messages in Zoom’s chat (Zoom supports private or broadcast messages) to bug people to turn on their webcams if they haven’t already done so.
Recommended Standardizations (for Discussion)
If you do some things in a relatively standard way across your department or university, it will make life easier for students. For example, if they have to search in email for the Zoom link to one class, on Piazza for a second, and on Canvas for a third, it will add complexity to their lives. Let’s standardize where we can to make things simpler for our students during this messy time.
I would urge your department or academic unit to consider the following standard “default” practices for any instructors that are comfortable with adopting them. These should likely be discussed as a group to see if the team is comfortable with them.
Make live, in-class attendance mandatory, unless they have good reason not to attend.
- Students are already much more isolated than usual, so live participation in classes helps tie the community back together. Also, live participation will improve everyone’s experience—the student’s, their peers, and yours.
- Good reasons not to attend live include being in a very different time zone, a conflicting class, being in a low bandwidth environment, or any other reason that attending live would cause undue hardship.
Ask everyone to turn on their webcam. This will make everyone more engaged. If everyone in your department does this, it will reduce the feeling of any one instructor being the “mean one” who intrudes on everyone’s privacy.
Standardize on tools for homework submissions and for discussion forums. For example, I like using Gradescope for homework submission and Piazza for discussions.
Use one place to schedule Zoom sessions. For example, if your university uses Canvas, that could be a good way to schedule Zoom sessions and post videos (while staying compliant with student privacy laws).
For more details and other recommendations, view the full guide here.

